
In this post I will take you through a Plein Air session. I am going to use a method of painting over a stinker (failed painting)...


You have them. So do I. Everyone that paints does too. Not everything we do comes out the way we intended. The best you can do is try, play, fail, learn and keep going. I don't get as frustrated as I used to. (if you do get insanely frustrated I recommend a good panel-they skip across the lake nicely).
This particular demo is on a panel I made from mahogany door skin that I made. It's sized and at least triple lead primed. The stinker on there is a still life that never went anywhere.


If your stinker is fairly wet you can just rub it off. This one was dry. I chose to sand it down a bit, just to get rid of the ridges. I use the stinker sometimes to show through in places if there is an opportunity.

Next I clean it off, wipe it down and it's ready to go!


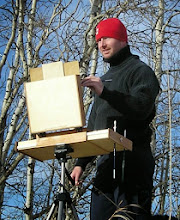
It's a gorgeous day. No wind. There is an eerie calm we get sometimes with a chinook in this part of Alberta, Canada. I find a good spot and set up.

I know it's going to be a fairly cool painting so I make a decision to have a warm underpainting. I put on a burnt sienna/turpentine wash. I use turpentine so it'll set up faster. I also prefer the feeling of painting over this initial wash. I want to be able to have both the warm and the old painting coming through in spots. I generally do this right away, before I have set out my palette.


I know it's going to be a fairly cool painting so I make a decision to have a warm underpainting. I put on a burnt sienna/turpentine wash. I use turpentine so it'll set up faster. I also prefer the feeling of painting over this initial wash. I want to be able to have both the warm and the old painting coming through in spots. I generally do this right away, before I have set out my palette.

Next, I eat. I have been out for awhile hiking and scouting. I like to think I am ready for anything. I get into some precarious spots sometimes so if I get stuck without food, water or warmth, bad on me. On my breaks I scout out other close by areas. One time, I fell through the ice up to my shoulders. Stupidly, I painted for another hour after that. In my defence, I had already started painting and had a good one going. I slept well that night...


Anyway, getting back- This also allows time for the wash to set up. I make sure I've set out the palette, get everything ready to go so I can just focus, and I start.


I figure out what I want to get in the scene. Sit there and observe. Next I get my darkest dark, the big shapes and most of the composition sorted out.

Now I work on the focal point of the painting. I work back and forth sort of like doing a puzzle. Mostly working out the areas adjacent to each other; comparing their colour, values and edges. Not really finishing as I go but close enough to move on.

The focal point is now blocked in and for the most part what I want.

I add most of the mid ground colour, leaving warm bits throughout to create a harmony. This stage is fairly loose because most of the snow in the shade is is similar in colour and value.


Union rules stipulate it's time for coffee. I get up, stretch, walk around and not look at the painting for a little while. The light is fairly consistent so I'm not worried about losing it. When I come back I clean the palette, (which I have done frequently throughout). Now I'm ready to finish it up!

I put in the final highlights, some knife-work in the foreground. both of which I leave pretty thick. This is all I really came here for so I sign it, pack everything up and call it a day.

Now I work on the focal point of the painting. I work back and forth sort of like doing a puzzle. Mostly working out the areas adjacent to each other; comparing their colour, values and edges. Not really finishing as I go but close enough to move on.

The focal point is now blocked in and for the most part what I want.

I add most of the mid ground colour, leaving warm bits throughout to create a harmony. This stage is fairly loose because most of the snow in the shade is is similar in colour and value.

It's getting close to the end now. I get into the snow that is in the light.

Union rules stipulate it's time for coffee. I get up, stretch, walk around and not look at the painting for a little while. The light is fairly consistent so I'm not worried about losing it. When I come back I clean the palette, (which I have done frequently throughout). Now I'm ready to finish it up!

I put in the final highlights, some knife-work in the foreground. both of which I leave pretty thick. This is all I really came here for so I sign it, pack everything up and call it a day.
Todd,
ReplyDeleteYou've turned this simple little scene into one of beauty! Love this painting!
Thanks Bobbi!
DeleteWonderful painting...thanks for the demo!
ReplyDeleteEnjoyed the painting, and saw there was a link to this and had to check it out. Love the commentary, and an artist with a sense of humor. We find this mostly with the plein air folks :-)
ReplyDeleteThanks for reading Mary! You need to have a sense of humour and a touch of insanity to keep from going crazy, as you know Gregory.
ReplyDeleteYou should be insanely proud of that accomplishment. it is so beautiful Todd
ReplyDelete